Thursday, August 31, 2006

Signing My Name


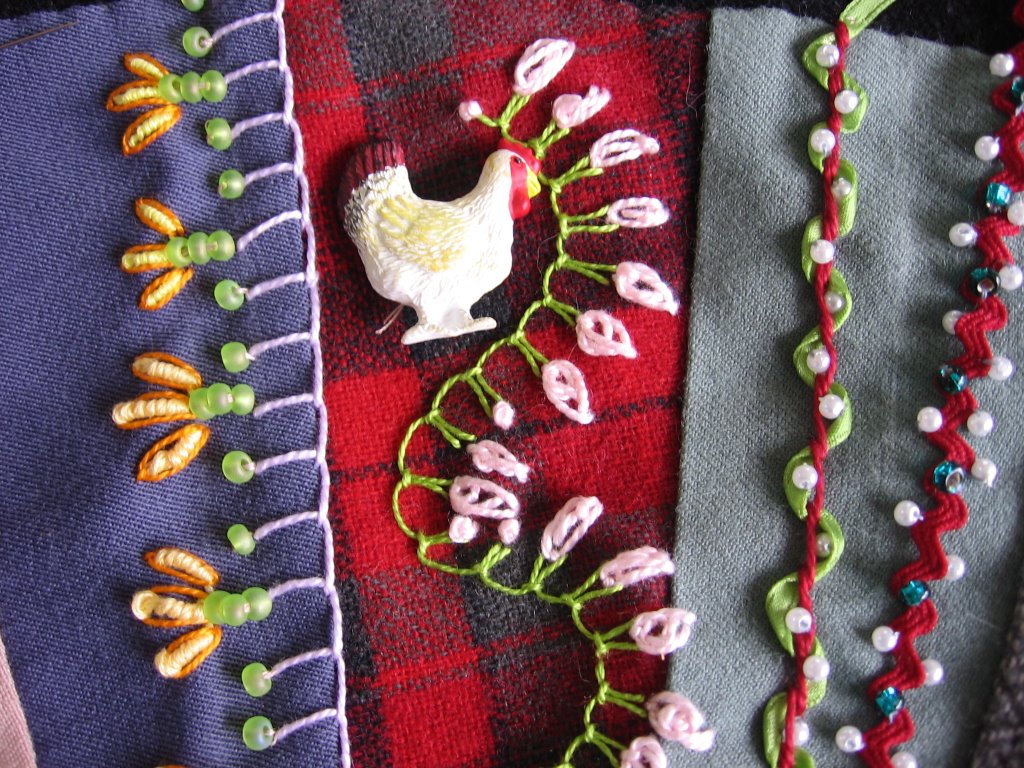
...well not my name, but my initials. I decided to put my initials into this quilt, and it got a little Las Vegas-y on me with the pearls and all, but I decided not to take it out (for the moment). It's hard to tell but this is chain stitch embellished with small pearls. I also did my homage to Georgia O'Keefe by giving this steer head a crown of flowers. I must've used the flash on this picture, because the lighting is over-exposed.

I've also been making the blocks for this crazy quilt by cleaning out my scrap drawer. It's pretty much empty now, and I love this kind of mindless sewing. I have a lovely red border for it, red being my favorite neutral. When I get inspired I'll sew it all together and put on the border. I won't be embellishing this quilt as it really is just a utility piece.


I'm off to San Francisco on Saturday for a reunion of my college girlfriends. I haven't seen several of them for many years, and I'm very excited. I also hope to visit some museums and to eat at some good restaurants. I'll report back next week.

Thursday, August 24, 2006

A Small Break in the CQ Flow

Awhile back I posted a picture of some Alexander Henry fabric I'd bought called "Las Senoritas." Well, I ended up buying a second piece of it to make Michael a Hawaiian-style shirt. Here's how it came out:

I used a McCall's pattern that is marketed as a "2-hour" project. This is an optimistic estimate, but it's a simple pattern, and for the man's version you don't need to make any darts. For the first time I used the button-holer on my Janome 6500, which is approaching its first birthday. I even sewed the buttons on by machine, which I'd heard of but had never tried. It's very cool, though I'm not sure it actually saves that much time.

Michael is an avid collector of Hawaiian shirts, so he was very happy to have this one. When he bought one with pin-up girls and martini glasses on it, I knew he wouldn't be self conscious about wearing "Las Senoritas." If I had it to do again, I would make sure that the repeats in the fabric didn't line up in the front. Those two women with the hats side-by-side draw a lot of focus to themselves.

I do have an update on my CQ fans. I decided to sit down and tackle some of the stitches that had given me some trouble. I set up my computer and read through step by step the very helpful stitch dictionary directions on Sharon's blog with the sampler and the threaded needle in my hand. Here are my yellow bullion stitches, which I tried with both 6 and 3 strands of floss, my up and down buttonhole stitch with pink oyster stitch embellishments, a pekinese stitch in which I used a thin green ribbon to thread the back stitches, and some embellished rick-rack.


I marked the curved line for the up and down buttonhole vine with a quarter and a sliver of soap. I may move to embellish the open areas now, and leave a few fan blades for straight line embellishments in the series that I can't resist.

Thursday, August 17, 2006

Third Fan Finished!


I've finished the third fan in my sampler. Here are some of the details I used from Sharon's 100 details challenge:

Here I used a beaded button, beads and chain stitches to embellish a bit of lace. I've had these Peter Rabbit buttons for a long time. I've always loved Beatrix Potter characters.

I liked the look of the stacked chevron stitches. I composed some beads in the empty spaces in the middle.

Here I used a buttonhole stitch with a bead composition.

Ta-dah! The third finished block! I have enough of the gold trim to use on all four fans. I trimmed the bottom of this one with a ribbon and beads. Debra had a good tip about putting a small bead in the middle of those red caston stitches to keep them from flopping around. It works great.

As I'm getting to the end of this project I'm thinking ahead to the next one(s). I've got this unquilted fish themed top and I'm thinking of doing an underwater embellishment.

Friday, August 11, 2006

Fan Update


I've done a few more fan blades on my crazy quilt. On the left is my version of Day 51's silk ribbon daisy. Next to that is jumbo rick-rack embellished with straight stitches, detached chains, and buttons. It reminds me of a Jane Sassaman tree.


On the left in this photo is whipped feather stitch and tiny caston flowers. I used slippery 2mm silk to whip stitch so it slides around a lot. I won't use that combination again. Next to that is some vintage trim embellished with beads, straight, and chain stitch. I ran out of the lavender pearl cotton before I finished the row, but I found more in my statsh today so I can finish up.

I starting to think about how to embellish the open spaces around the fans. These are some nice distinct spaces in which to do something special.

Monday, August 07, 2006

Shisha


Annie posted instructions on how to do shisha embroidery and in her example, she used it to attach a coin. I took her idea and dug out some coins left from my trip to Mexico last year. I like the idea of using things with memories attached to them.

I also unearthed some old issues of Piecework magazine, and in one from 1994 they had an article on shisha embroidery with a lesson that incorporated cretan stitch, so I incorporated that as well. Now that I'm doing this embroidery work, I'm looking through old books and magazines that I haven't used in a long time and scanning them for ideas.

In my civilian life I'm getting ready to go back to school and I'm also doing research for a scholarly article I'm writing. I have made the important discovery that if I sit at a table and don't work on anything complicated, I can knit and read at the same time. I'm currently knitting a throw from this recent fun book (great for beginners). With both needle and pen, I have become a truly dangerous woman.

Economy Block and Large-Scale Fabrics

Recenlty I decided to take out and use the stash of Asian-themed fabrics I'd set aside.  Many of them are large scale, so I wanted to fe...